How To Serve Multiple Django Applications with uWSGI and Nginx in Ubuntu 20.04
Setup a webserver to serve Django apps
Overview
This is a concise guide to have an Ubuntu server with multiple Django apps.
In this way we can easily have a Virtual Private Server and set it up to be our server for Django projects.
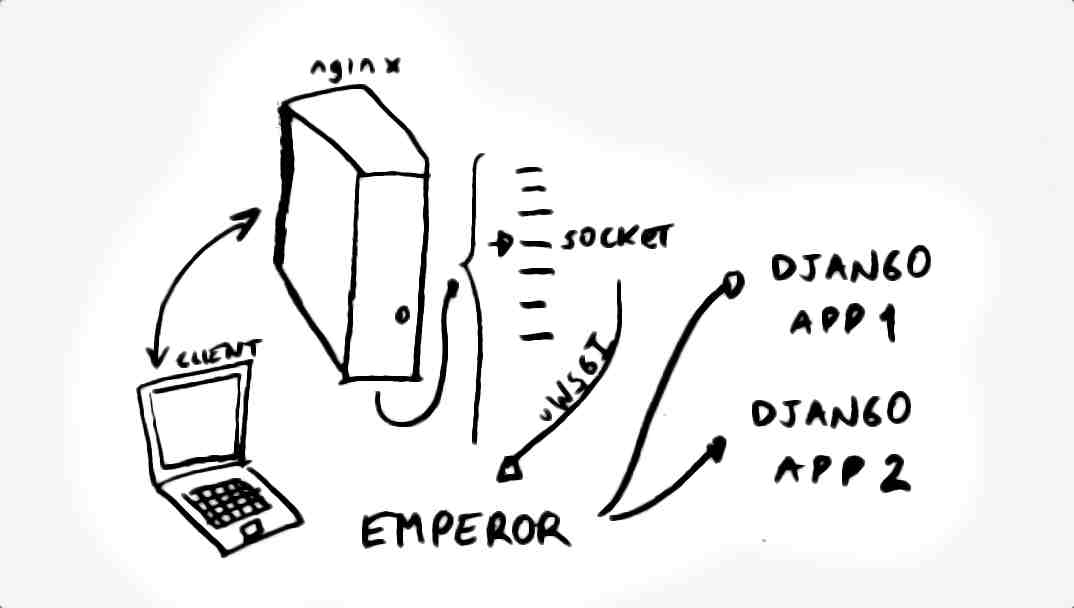
For this we will use:
- A web server, nginx, to process incoming requests from clients.
- Communication between web server and Django with uWSGI via sockets
- Using uWSGI as a systemd job, the preferred way to start processes in Ubuntu.
Users
If you just have a root user, we are going to create another one
called ubuntu to handle the apps properly.
This step can be skipped if you already have an user, just make sure to use the right one in the following steps.
$ useradd -m -s /bin/bash ubuntu
$ passwd ubuntu
Now we have the Linux user ubuntu.
Django apps
We expect a Django app with:
- a PIP
/requirements.txtfile which list the Django packages used in the app - a settings file for production like
/myproject_first/settings/production.py
Code
Put your Django apps in /opt/apps.
$ mkdir /opt/apps
$ chown -R ubuntu:ubuntu /opt/apps
From your server, copy your projects there, e.g.: rsync -avP /django/local/myproject_first new-server:/opt/apps
For this guide, we consider having two Django projects:
/opt/apps/myproject_firstand/opt/apps/myproject_second
Virtual envs
Create each virtual environment under your Linux user home directory.
$ apt-get install python3-venv
Then create the virtual environment for each Django app:
$ su ubuntu
$ python3 -m venv ~/.virtualenvs/myproject_first
$ source ~/.virtualenvs/myproject_first/bin/activate
(myproject_first)$
And install each requirements (note that we have already activated the virtual environment):
(myproject_first)$ pip install -r /opt/apps/myproject_first/requirements.txt
Application server
The uWSGI1 (Web Server Gateway Interface) project implements the wsgi2 standard which defines an interface between web servers and Python web applications, and also provides process managers and monitors.
Install
We are going to create a uwsgi server in its emperor mode.
Install uWSGI globally, avoid installing it inside a virtual environment.
sudo pip install uwsgi
Configure uwsgi
From all the features of uWSGI, we will use the multi-app deployment feature called: The uWSGI Emperor3.
It is a special uWSGI instance that will monitor specific events and will spawn/stop/reload instances (known as vassals, when managed by an Emperor) on demand.
We need to create configuration files for each Django app. These
configurations will be placed in /etc/uwsgi/vassals so the daemon
can detect any changes to them and act accordingly.
Create the above directory:
# mkdir --parents /etc/uwsgi/vassals
And a uWSGI ini configuration file /etc/uwsgi/emperor.ini with the
following content:
[uwsgi]
emperor = /etc/uwsgi/vassals
This way we can call start the server and tell to monitor the vassals directory for new configuration files, e.g. /usr/local/bin/uwsgi –ini /etc/uwsgi/emperor.ini.
systemd
To handle system processes and daemons, Ubuntu relies on systemd, which is “a system and session manager for Linux, compatible with SysV and LSB init scripts.”4
To have our uwsgi server daemon, we will create a systemd script so it can be handled with the systemctl command.
Create a systemd script: https://uwsgi-docs.readthedocs.io/en/latest/Systemd.html
In /etc/systemd/system/emperor.uwsgi.service:
[Unit]
Description=uWSGI Emperor service
After=syslog.target

[Service]
ExecStart=/usr/local/bin/uwsgi --ini /etc/uwsgi/emperor.ini
Restart=always
KillSignal=SIGQUIT
Type=notify
NotifyAccess=all
RuntimeDirectory=uwsgi

[Install]
WantedBy=multi-user.target
Add vassals
For each Django app, add an ini file in /etc/uwsgi/vassals/ with
its uwsgi configuration, in this case for the app
/opt/app/myproject_first we will create the file /etc/uwsgi/vassals/myproject_first.ini:
Note: If you haven’t already done it, we need to have the new server
listed in the ALLOWED_HOSTS setting, this can be done by having the
following setting: ALLOWED_HOSTS = os.getenv('DJANGO_ALLOWED_HOSTS').split(',') if os.getenv('DJANGO_ALLOWED_HOSTS') else [] and then setting the
environment variable DJANGO_ALLOWED_HOSTS with the server’s ip.
# myproject_first.ini file
[uwsgi]

project = myproject_first
uid = ubuntu
gid = www-data

##########
# DJANGO #
##########

# Django's full path base directory
chdir           = /opt/apps/%(project)
# Django's wsgi
module          = %(project).wsgi:application
# Virtualenv full path
home            = /home/ubuntu/.virtualenvs/%(project)
env = DJANGO_SETTINGS_MODULE=%(project).settings.production
#env = DJANGO_ALLOWED_HOSTS=192.81.xx.xx

###########
# PROCESS #
###########

master          = true
# maximum number of workers
processes       = 1 #10, 5
socket = /run/uwsgi/%(project).sock
chown-socket = %(uid):%(gid)
chmod-socket = 660

# clear environment on exit
vacuum          = true

pidfile=/tmp/uwsgi_%(project).pid
harakiri=20
max-requests=5000
Web server
Install
Install nginx.
$ sudo apt install nginx
Virtual Host
Create a virtual host for each Django app, in /etc/nginx/sites-available/myproject_first.conf
upstream django_myproject_first {
    server unix:///run/uwsgi/myproject_first.sock;
}

# configuration of the server
server {
    # the port your site will be served on
    listen      80;
    # the domain name it will serve for
    server_name myproject_first.com;

    charset     utf-8;

    # max upload size
    client_max_body_size 75M;

    # # Django media
    # location /media  {
    #     alias /path/to/your/mysite/media;
    # }

    # location /static {
    #     alias /path/to/your/mysite/static;
    # }

    # non-media requests handled by uwsgi
    location / {
        uwsgi_pass  django_myproject_first;
        include     /etc/nginx/uwsgi_params; # the uwsgi_params file you installed
    }
}
Test everything is fine: nginx -t.
Then enable the new site:
$ ln -s /etc/nginx/sites-available/myproject_first.conf /etc/nginx/sites-enabled/
If you choose to serve static and media files with nginx, you should add it using the alias directive.
Start servers
Now start the server and check its status, using root user.:
# systemctl start nginx.service
# systemctl daemon-reload; systemctl restart emperor.uwsgi.service
# systemctl status emperor.uwsgi.service
● emperor.uwsgi.service - uWSGI Emperor service
     Loaded: loaded (/etc/systemd/system/emperor.uwsgi.service; disabled; vendor preset: enabled)
     Active: active (running) since Mon 2020-10-26 08:55:30 -03; 5s ago
   Main PID: 1620374 (uwsgi)
     Status: "The Emperor is governing 1 vassals"
      Tasks: 3 (limit: 1137)
     Memory: 36.8M
     CGroup: /system.slice/emperor.uwsgi.service
             ├─1620374 /usr/local/bin/uwsgi --ini /etc/uwsgi/emperor.ini
             ├─1620375 /usr/local/bin/uwsgi --ini myproject_first.ini
             └─1620388 /usr/local/bin/uwsgi --ini myproject_first.ini

Oct 26 08:55:30 peachepe uwsgi[1620375]: your server socket listen backlog is limited to 100 connections
Oct 26 08:55:30 peachepe uwsgi[1620375]: your mercy for graceful operations on workers is 60 seconds
Oct 26 08:55:30 peachepe uwsgi[1620375]: mapped 145808 bytes (142 KB) for 1 cores
Oct 26 08:55:30 peachepe uwsgi[1620375]: *** Operational MODE: single process ***
Oct 26 08:55:31 peachepe uwsgi[1620375]: WSGI app 0 (mountpoint='') ready in 1 seconds on interpreter 0x55973cd886d0 pid: 1620375 (default app)
Oct 26 08:55:31 peachepe uwsgi[1620375]: *** uWSGI is running in multiple interpreter mode ***
Oct 26 08:55:31 peachepe uwsgi[1620375]: spawned uWSGI master process (pid: 1620375)
Oct 26 08:55:31 peachepe uwsgi[1620374]: Mon Oct 26 08:55:31 2020 - [emperor] vassal myproject_first.ini has been spawned
Oct 26 08:55:31 peachepe uwsgi[1620375]: spawned uWSGI worker 1 (pid: 1620388, cores: 1)
Oct 26 08:55:31 peachepe uwsgi[1620374]: Mon Oct 26 08:55:31 2020 - [emperor] vassal myproject_first.ini is ready to accept requests
And our server is ready to accept requests.
Permament changes
Make the Systemd service to start after reboot by enabling the service:
# systemctl enable emperor.uwsgi.service
Created symlink /etc/systemd/system/multi-user.target.wants/emperor.uwsgi.service → /etc/systemd/system/emperor.uwsgi.service.
Update code
Every time we publish a change into the production server, we need to gracefully restart uWSGI.
As we have used pidfile=/tmp/uwsgi_%(project).pid in
/etc/uwsgi/vassals/myproject_first.ini, then we need to touch5 use
that pid file and do uwsgi --reload /tmp/uwsgi_myproject_first.pid.
Other options to restart the server are6:
# using kill to send the signal
kill -HUP `cat /tmp/project-master.pid`
# or the convenience option --reload
uwsgi --reload /tmp/project-master.pid
# or if uwsgi was started with touch-reload=/tmp/somefile
touch /tmp/somefile
Conclusion
After finishing the guide we will have:
- A Linux user called ubuntu.
- Web server receiving request at port 80.
- The following structure:
.
├── etc
│   ├── nginx
│   │   └── sites-available
│   │       ├── myproject_first.conf
│   │       └── myproject_second.conf
│   ├── systemd
│   │   └── system
│   │       └── emperor.uwsgi.service
│   └── uwsgi
│       ├── emperor.ini
│       └── vassals
│           ├── myproject_first.ini
│           └── myproject_second.ini
├── home
│   └── ubuntu
│       └── .virtualenvs
│           ├── myproject_first
│           └── myproject_second
└── opt
    └── apps #django src
        ├── myproject_first
        └── myproject_second
And sockets ready:
# ls -lrtad /run/uwsgi /run/uwsgi/*
srw-rw---- 1 ubuntu www-data  0 Oct 26 08:55 /run/uwsgi/myproject_first.sock
drwxr-xr-x 2 root     root     60 Oct 26 08:55 /run/uwsgi
References
- uwsgi, django + nginx https://uwsgi-docs.readthedocs.io/en/latest/tutorials/Django_and_nginx.html
- systemd docs https://wiki.debian.org/systemd/Services
- nginx alias directive https://nginx.org/en/docs/http/ngx_http_core_module.html#alias
- August 1, 2023
- How to create a reusable Django app and distribute it with PIP or publish to pypi.orgJune 29, 2021
- How To Serve Multiple Django Applications with uWSGI and Nginx in Ubuntu 20.04
- How to add favicon to Django in 4 stepsSeptember 3, 2020
- Categories in Django with BreadcrumbsAugust 30, 2020
- How To Migrate From SQLite To PostgreSQL In Django In 3 stepsAugust 28, 2020
- Practical guide to internationalize a Django app in 5 steps.August 24, 2020
- Disable new users singup when using Django's allauth packageSeptember 3, 2019
- How to add ads.txt to Django as requested by Google AdsenseAugust 30, 2019
- Have multiple submit buttons for the same Django formJuly 2, 2019
- Better Testing with Page Object Design in DjangoMay 1, 2019
- Generating slugs automatically in Django without packages - Two easy and solid approachesFebruary 14, 2019
- How to set up Django tests to use a free PostgreSQL database in HerokuFebruary 13, 2019
- Dynamically adding forms to a Django FormSet with an add button using jQueryFebruary 6, 2019
- Use of Django's static templatetag in css file to set a background imageFebruary 1, 2019
- Activate Django's manage.py commands completion in Bash in 2 stepsJanuary 29, 2019
- Sending Emails with Django using SendGrid in 3 easy stepsJanuary 9, 2019
- Adding Users to Your Django Project With A Custom User ModelSeptember 21, 2018
- Setting Up A Factory For One To Many Relationships In FactoryboyApril 17, 2018
- Generate UML class diagrams from django modelsMarch 24, 2018
- Set Up Ubuntu To Serve A Django Website Step By StepJuly 3, 2017
- Django Project Directory StructureJuly 16, 2016
- How to Have Different Django Settings for Development and Production, and environment isolationJune 10, 2016
- Django OverviewJune 2, 2016
Django Forms
- Adding a Cancel button in Django class-based views, editing views and formsJuly 15, 2019
- Using Django Model Primary Key in Custom Forms THE RIGHT WAYJuly 13, 2019
- Django formset handling with class based views, custom errors and validationJuly 4, 2019
- How To Use Bootstrap 4 In Django FormsMay 25, 2018
- Understanding Django FormsApril 30, 2018
- How To Create A Form In DjangoJuly 29, 2016
Articles
Subcategories
Except as otherwise noted, the content of this page is licensed under CC BY-NC-ND 4.0 . Terms and Policy.
Powered by SimpleIT Hugo Theme
·